driving schools for manual transmission

Dedicated manual transmission driving schools are experiencing a revival, offering specialized instruction for those seeking mastery of stick shift vehicles.

These academies, like Stick Shift Driving Academy, provide focused learning environments and expert guidance, catering to a growing interest in this skill.

With over 15,000 students trained since 2017, these schools are becoming vital for preserving and promoting the art of manual driving;

The Resurgence of Manual Driving

Despite the prevalence of automatic transmissions, a notable resurgence in interest surrounding manual driving is currently underway. This revival isn’t merely nostalgic; it’s fueled by a desire for enhanced vehicle control and a deeper connection with the driving experience.

Enthusiasts are actively seeking out specialized driving schools, like Stick Shift Driving Academy, to learn or refine their skills. This demand is driven by the availability of manual transmissions in many sports cars and high-performance vehicles, offering a unique and engaging driving dynamic.

The appeal extends beyond performance, with drivers appreciating the mechanical understanding gained through mastering a manual gearbox, contributing to a more immersive and rewarding driving journey.

Why Choose a Dedicated Manual School?

Opting for a dedicated manual transmission driving school provides a focused learning environment unavailable in general driving courses. These schools, such as Stick Shift Driving Academy, offer complete curriculums covering everything from basic clutch control to advanced maneuvers like parallel parking.

Crucially, many provide vehicles for practice, eliminating the risk of damaging your own car during the learning process. Instructors offer expert guidance in open practice areas, fostering confidence and skill development.

This specialized approach ensures a thorough understanding of manual driving techniques, leading to safer and more proficient drivers.

Benefits of Learning Manual Transmission

Mastering a manual transmission enhances vehicle control, deepens automotive understanding, and unlocks access to a wider range of driving experiences and vehicles.

Enhanced Vehicle Control

Learning manual transmission provides a significantly more connected driving experience, fostering a heightened sense of control over the vehicle. Unlike automatic systems, drivers actively manage gear selection and engine speed, demanding precise coordination and responsiveness.

This direct engagement cultivates a deeper understanding of the vehicle’s mechanics and allows for more nuanced control in various driving conditions, such as navigating challenging terrain or executing precise maneuvers.

The ability to choose the optimal gear for any situation empowers drivers to maximize efficiency and responsiveness, ultimately leading to a safer and more engaging driving experience.

Deeper Understanding of Automotive Mechanics

Mastering a manual transmission inherently necessitates a greater comprehension of how a vehicle functions internally. Drivers learn to actively manage the clutch, gears, and engine, gaining practical insight into the relationship between these components.

This hands-on experience transcends simply operating a vehicle; it fosters a deeper understanding of automotive mechanics, enabling drivers to diagnose potential issues and appreciate the intricacies of the powertrain.

Such knowledge can prove invaluable for vehicle maintenance and informed decision-making regarding repairs, ultimately enhancing ownership experience.

Access to a Wider Range of Vehicles

Proficiency in manual transmission unlocks access to a broader spectrum of vehicles, particularly those favored by driving enthusiasts. Many sports cars and high-performance automobiles are still exclusively offered with manual gearboxes, catering to drivers who prioritize control and engagement.

Learning to drive a stick shift expands automotive choices, allowing individuals to experience the thrill of driving classic cars and specialized models unavailable in automatic configurations.

This skill opens doors to a more diverse and rewarding driving experience, appealing to those seeking a deeper connection with their vehicle.

Finding the Right Manual Driving School

Selecting the ideal manual driving school requires careful consideration of location, instructor expertise, and the school’s overall reputation based on reviews.

Prioritize schools offering convenient access and qualified instructors to ensure a positive and effective learning experience.

Location and Accessibility

Choosing a conveniently located manual driving school significantly impacts your learning journey. Consider schools easily accessible by public transportation or with ample parking if you drive.

Proximity to familiar, low-traffic areas is beneficial for initial practice sessions, reducing anxiety and fostering confidence. A school’s operating hours are also crucial; ensure they align with your schedule.

Look for schools offering flexible lesson times to accommodate work or other commitments. Accessibility extends beyond physical location – a school with a user-friendly website and responsive communication is a plus.

Instructor Qualifications and Experience

Experienced instructors are the cornerstone of any successful manual transmission driving school. Seek instructors with a proven track record of teaching stick shift, demonstrating patience and clear communication skills.

Verify their certifications and ensure they possess a thorough understanding of vehicle mechanics and safe driving practices. A skilled instructor can quickly identify and address individual learning challenges.

Inquire about their experience with various vehicle types and driving conditions. Positive testimonials and a commitment to student success are strong indicators of instructor quality and dedication.

School Reputation and Reviews

Investigating a manual driving school’s reputation is crucial before enrolling. Online reviews and testimonials offer valuable insights into the experiences of previous students, revealing strengths and weaknesses.

Look for consistent positive feedback regarding instructor quality, curriculum effectiveness, and overall learning environment. Check for accreditation or affiliations with recognized driving organizations.

A school like Stick Shift Driving Academy has built a strong reputation, assisting over 15,000 learners. Consider the school’s longevity and community involvement as indicators of reliability and commitment.

Curriculum and Lesson Structure

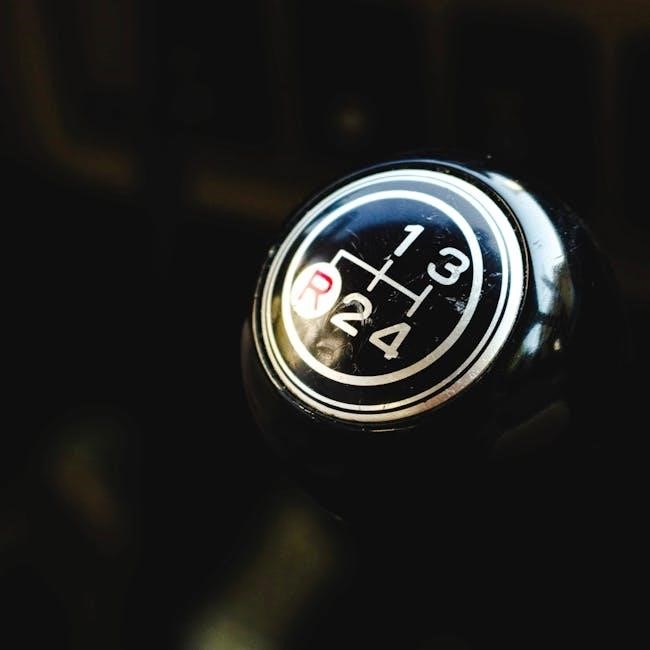
Comprehensive courses begin with clutch control and gear shifting, progressing to hill starts, smooth takeoffs, and advanced maneuvers like parallel parking.

Instructors cover upshifting, downshifting, and techniques for mastering complete vehicle control in various driving scenarios.

Basic Clutch Control and Gear Shifting

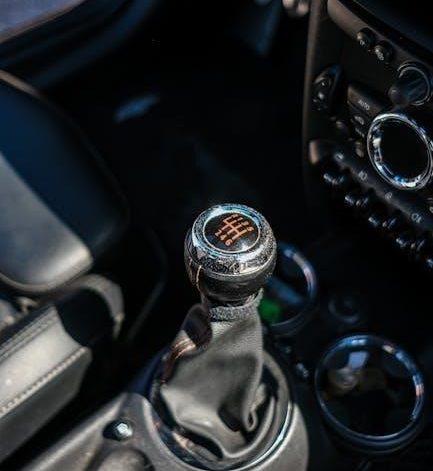
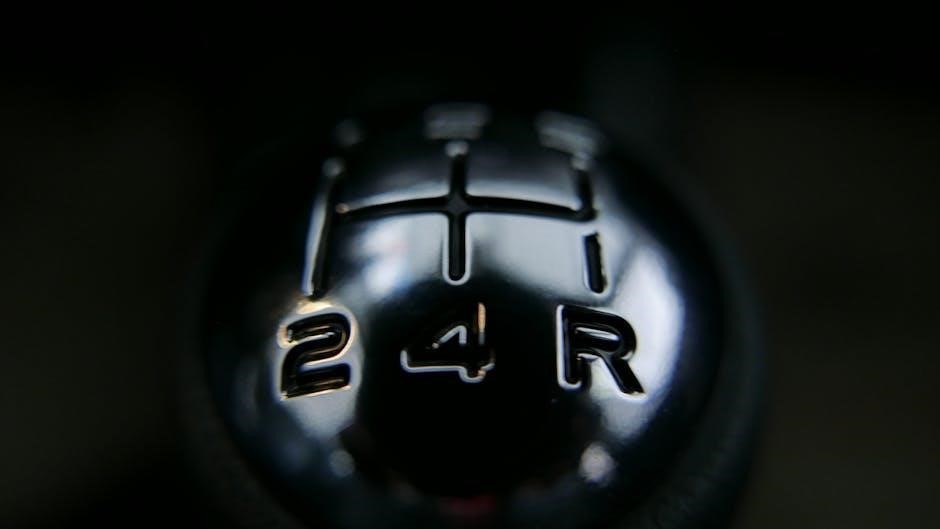
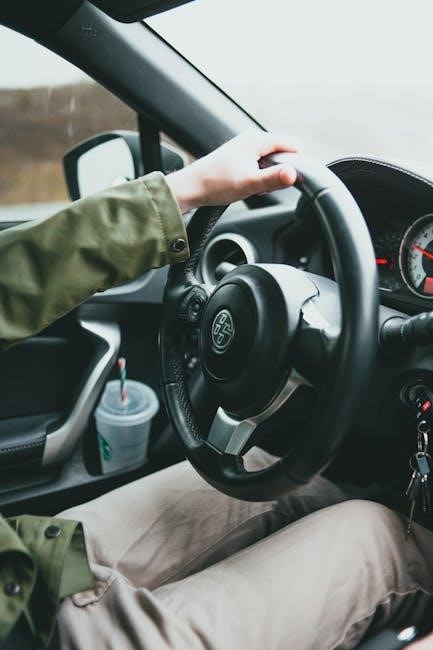
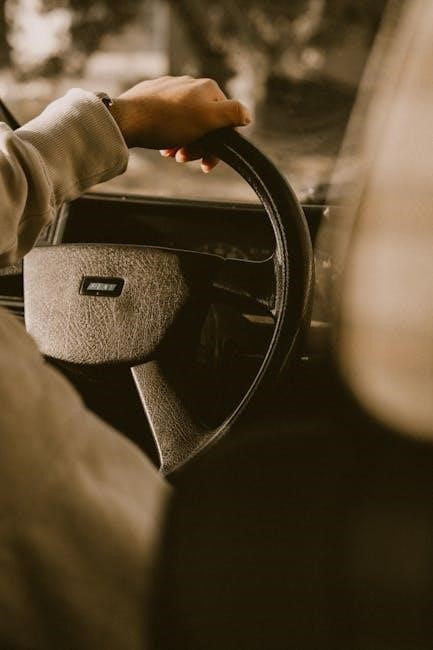
Initial lessons heavily emphasize mastering the coordination between the clutch pedal and gear selector – the foundation of manual driving. Students begin with stationary exercises, learning to find the ‘friction point’ where the engine engages.

Instructors guide learners through smooth gear changes, starting with first gear and gradually progressing through the entire range. Emphasis is placed on avoiding stalling and achieving seamless transitions between gears.

Practice occurs in a controlled environment, often an empty parking lot, allowing students to build confidence and muscle memory before encountering traffic.

Hill Starts and Smooth Takeoffs

Hill starts represent a significant challenge for new manual drivers, requiring precise coordination to prevent rolling backward. Driving schools dedicate substantial time to this maneuver, teaching techniques like using the handbrake for stability.

Students learn to smoothly transition from brake to accelerator while simultaneously releasing the clutch, maintaining control on inclines. Instructors emphasize quick footwork and anticipating the vehicle’s movement.

Smooth takeoffs from a standstill are also practiced extensively, focusing on minimizing jerking and achieving a controlled acceleration, building confidence and skill.

Upshifting and Downshifting Techniques

Mastering upshifting and downshifting is crucial for efficient and enjoyable manual driving; Schools emphasize timing and clutch control for seamless gear changes, avoiding jerky movements or engine strain.

Students learn to recognize optimal RPM ranges for upshifts, maximizing fuel efficiency and maintaining smooth acceleration. Downshifting techniques focus on matching engine speed to road speed, ensuring controlled deceleration.

Instructors guide learners through heel-toe downshifting (where applicable) and rev-matching, enhancing driving precision and vehicle responsiveness.

Advanced Maneuvers: Parallel Parking & 3-Point Turns

Successfully executing parallel parking and 3-point turns with a manual transmission demands precise clutch control and spatial awareness. Driving schools dedicate significant time to these challenging maneuvers.

Instructors break down each step, emphasizing smooth clutch engagement, steering adjustments, and throttle control to navigate tight spaces effectively. Students practice repeatedly in controlled environments.

The curriculum covers techniques for assessing parking space size, positioning the vehicle, and completing the maneuver without hitting obstacles, building confidence and skill.

Cost and Payment Options

Manual driving lesson costs vary, but schools often offer package deals and discounts to reduce the overall expense for students.

Flexible payment plans and potential financing options can make learning manual transmission more accessible to a wider range of individuals.

Average Lesson Costs

Determining the average cost of manual transmission driving lessons requires considering several factors, including location, lesson duration, and the school’s reputation. Generally, individual lessons can range from $75 to $150 per hour, though prices may fluctuate.

Many schools offer introductory packages, such as a three- or five-lesson bundle, which can provide a slight discount compared to booking individual sessions. Expect to invest between $300 and $750 for a basic introductory course, covering fundamental skills.

Specialized schools or those offering longer lesson times may charge higher rates, potentially exceeding $200 per session. It’s crucial to compare pricing structures and inquire about any hidden fees before committing to a program.

Package Deals and Discounts

Manual transmission driving schools frequently offer package deals designed to provide comprehensive training at a reduced overall cost. These packages typically bundle multiple lessons together, ranging from basic introductory courses to intensive skill-building programs.

Discounts are often available for students who pre-pay for a larger block of lessons, or for those who refer new clients to the school. Some schools may also offer seasonal promotions or discounts for specific demographics, like students or military personnel.

Exploring these options can significantly lower the total expense of learning to drive a manual vehicle, making the experience more accessible and affordable for aspiring drivers.

Payment Plans and Financing

Recognizing that the cost of driving lessons can be a significant investment, many manual transmission driving schools offer flexible payment plans to ease the financial burden. These plans typically involve breaking down the total cost into smaller, more manageable installments.

Some schools may partner with third-party financing companies to provide students with access to loans or credit options specifically designed for educational expenses. It’s crucial to carefully review the terms and conditions of any financing agreement.

Exploring these options ensures that learning to drive a manual transmission remains attainable for a wider range of individuals.

What to Expect During Your First Lesson

Your initial lesson will focus on vehicle familiarization, clutch and gear coordination exercises, and basic driving in a safe, controlled environment.

Instructors prioritize building a foundation for smooth operation and confident control of a manual transmission vehicle.

Vehicle Familiarization

The first step involves a comprehensive introduction to the specific vehicle you’ll be learning in, often provided by the driving school itself. Expect a detailed walkthrough of all essential controls, including the clutch pedal, gear stick, handbrake, and accelerator.

Instructors will explain the function of each component and how they interact, emphasizing the unique aspects of a manual transmission system. This initial phase aims to build comfort and confidence before even starting the engine, ensuring a solid understanding of the vehicle’s mechanics.

You’ll learn about the bite point of the clutch and how to locate it, a crucial skill for smooth starts and gear changes.

Clutch and Gear Coordination Exercises

Following vehicle familiarization, the focus shifts to mastering the delicate coordination between the clutch pedal and gear selector. Initial exercises typically involve practicing smooth engagement and disengagement of the clutch without stalling the engine.

Instructors guide students through finding the “bite point,” the precise position where the clutch begins to transmit power. Then, students practice shifting between first and second gear, concentrating on synchronizing pedal and lever movements.

These drills are performed in a controlled environment, like an empty parking lot, to build muscle memory and confidence.

Initial Driving in a Controlled Environment

After mastering basic clutch and gear coordination, students transition to their first driving experiences within a safe, controlled space – often an empty parking lot. This environment minimizes distractions and reduces pressure, allowing focus on fundamental skills.

Initial maneuvers involve starting from a standstill, practicing smooth acceleration, and maintaining a consistent speed. Instructors provide real-time feedback, correcting errors and reinforcing proper technique.

The goal is to build confidence and establish a solid foundation before venturing onto public roads.

Car Provided vs. Using Your Own Vehicle

Many schools, like Stick Shift Specialists, include a car for lessons, offering convenience and reducing wear on your personal vehicle.

However, practicing in your own car allows familiarity and accelerates skill development.

Advantages of School-Provided Cars

Utilizing a school-provided vehicle offers several key benefits for learners. Firstly, it eliminates the risk of damage or excessive wear and tear on your personal car during the initial learning phase, which can be particularly valuable.

Secondly, schools like Stick Shift Specialists ensure their vehicles are well-maintained and specifically suited for teaching manual transmission, providing a consistent and reliable learning experience.

Furthermore, it removes the logistical challenge of transporting your own vehicle to lessons, simplifying the process and allowing you to focus entirely on mastering the skills.

Benefits of Practicing in Your Own Car

While school cars are helpful, practicing in your own vehicle offers unique advantages. Familiarity with your car’s specific clutch feel, gear ratios, and overall handling characteristics accelerates learning and builds confidence.

This personalized experience translates directly to real-world driving scenarios, as you’ll be accustomed to the nuances of your vehicle.

Moreover, consistent practice in your own car reinforces the skills learned during lessons, fostering a deeper understanding and quicker mastery of manual transmission driving.

The Importance of Practice Beyond Lessons

Consistent practice is crucial for solidifying skills learned at a manual driving school; regular driving builds muscle memory and refines technique.

Finding suitable practice areas and adhering to a schedule are key to overcoming common mistakes and achieving proficiency.

Finding Suitable Practice Areas

Locating appropriate spaces for practice is paramount after completing lessons at a manual transmission driving school. Ideal areas include large, empty parking lots – often utilized by the schools themselves – offering a safe, controlled environment free from traffic hazards.

Quiet, lightly traveled industrial parks on weekends can also prove beneficial, allowing learners to focus on clutch control and gear changes without pressure. Avoid busy streets initially, prioritizing spaces where stalls or jerky movements won’t endanger others.

Gradually progress to inclines and varied road conditions as confidence grows, always prioritizing safety and responsible driving practices.

Regular Practice Schedule

Consistent practice is crucial for solidifying skills learned at a manual transmission driving school; sporadic attempts hinder progress. Aim for short, frequent sessions – 30-60 minutes several times a week – rather than infrequent, lengthy ones.

Establish a routine, incorporating various maneuvers like starting, stopping, shifting, and hill starts. Dedicate time to address specific weaknesses identified during lessons or independent practice.

Regularity builds muscle memory and reinforces proper technique, transforming conscious effort into instinctive action, ultimately fostering confident and proficient manual driving.

Common Mistakes and How to Avoid Them

New manual drivers often struggle with stalling, typically due to releasing the clutch too quickly or insufficient throttle. Practice smooth clutch engagement and coordinated footwork to mitigate this.

Another frequent error is “riding the clutch,” causing premature wear; fully depress the pedal during shifts. Incorrect gear selection, especially on hills, can also lead to issues.

Focus on listening to the engine and matching gear to speed. Consistent practice and mindful attention to these common pitfalls will accelerate skill development and build confidence.

Manual Transmission Car Rental Options for Practice

Renting a manual car offers valuable practice beyond lessons, though availability can be limited. Insurance coverage and rental costs should be carefully considered beforehand.

Rental Companies Offering Manual Vehicles

Finding rental companies offering manual transmission vehicles requires diligent searching, as they are becoming increasingly rare. Major companies like Enterprise, Avis, and Hertz often have limited or no manual options available in their standard fleets.

However, some smaller, local rental agencies or those specializing in enthusiast vehicles may still cater to drivers seeking this experience. Turo, a peer-to-peer car-sharing marketplace, frequently lists manual cars owned by individuals, providing a broader selection.

It’s crucial to check availability online or contact the rental company directly to confirm a manual transmission vehicle is guaranteed before making a reservation.

Cost of Renting a Manual Car

The cost of renting a manual transmission car varies significantly based on location, vehicle type, and rental company. Generally, expect to pay between $40 to $80 per day for a basic manual car, comparable to automatic rates.

However, specialty or sports cars with manual transmissions can easily exceed $150 or even $300 per day. Turo rentals often present a wider price range, influenced by the vehicle owner’s discretion.

Always factor in additional costs like insurance, mileage fees, and potential security deposits when calculating the total rental expense.

Insurance Considerations

When renting a manual transmission car for practice, carefully review your insurance coverage. Your personal auto insurance may not extend to rentals, especially if the rental is for driving practice.

Rental companies typically offer supplemental liability insurance (SLI) and collision damage waiver (CDW), adding to the overall cost.

Consider if your credit card provides rental car insurance benefits. Thoroughly understand the policy’s terms, including deductibles and exclusions, before declining coverage offered by the rental agency.

Specialized Manual Driving Schools: Stick Shift Specialists

Stick Shift specialists, established since 2017, boast extensive experience and unique methodologies, having successfully guided over 15,000 students to manual driving proficiency.

History and Experience of Specialist Schools

Specialized manual driving schools, like Stick Shift Driving Academy, emerged to address a growing niche – the desire to learn and preserve the skill of driving a manual transmission vehicle. While automatic transmissions gained dominance, these schools recognized a continued demand from enthusiasts and those seeking deeper vehicle control.

Founded in 2017, Stick Shift has rapidly grown, successfully training over 15,000 individuals. This experience allows them to refine their curriculum and teaching methods, focusing on practical skills and building driver confidence. Their longevity demonstrates a commitment to manual driving education in an evolving automotive landscape.

Unique Teaching Methodologies

Specialist manual driving schools distinguish themselves through focused, practical approaches. They often utilize a “complete curriculum,” covering everything from initial gear engagement to advanced maneuvers like parallel parking. A key element is providing a dedicated, open practice area – an empty parking lot – for students to build muscle memory without traffic pressures.

Furthermore, many schools, such as Stick Shift, include a vehicle as part of the lesson, removing the barrier of access for beginners. This hands-on, immersive style accelerates learning and fosters a deeper understanding of clutch and gear coordination.

Success Rates and Testimonials

Stick Shift specialists boast an impressive track record, having successfully trained over 15,000 individuals in the art of manual transmission driving since 2017. This substantial number speaks volumes about their effective teaching methodologies and dedicated instructors.

While specific pass rates aren’t always publicly advertised, the longevity and growth of these schools suggest high student satisfaction. Positive word-of-mouth and enthusiastic testimonials highlight the confidence gained and enjoyment experienced by learners mastering this valuable skill.

The Future of Manual Transmission Driving

Despite automation, demand for manual skills persists, fueled by enthusiast drivers and the preservation of classic vehicles; driving schools will play a crucial role.

Demand for Manual Driving Skills

Although automatic transmissions dominate the market, a dedicated segment of drivers actively seeks to learn and maintain manual driving proficiency. This demand stems from enthusiasts who appreciate the enhanced control and engagement offered by a stick shift.

Furthermore, many high-performance and classic sports cars are exclusively equipped with manual transmissions, creating a niche market for skilled drivers. Driving schools specializing in manual transmission are therefore positioned to cater to this enduring interest, ensuring the skill isn’t lost to automation.

The ability to drive a manual car remains a valuable asset for those seeking a more connected and rewarding driving experience.

Preservation of Manual Transmission Vehicles

The continued existence of classic and enthusiast vehicles with manual transmissions relies on a pool of drivers capable of operating them. As fewer new cars offer manual options, maintaining this skill becomes crucial for preserving automotive history and culture.

Manual driving schools play a vital role in this preservation effort by equipping new generations with the knowledge and confidence to enjoy these vehicles. They ensure these cars aren’t relegated to static displays, but remain actively driven and appreciated.

This proactive approach safeguards a significant part of automotive heritage.

The Role of Driving Schools in Maintaining the Skill

Driving schools specializing in manual transmissions are becoming increasingly important as the skill diminishes with fewer new cars offering a stick shift. They actively counteract this trend by providing focused instruction and building driver confidence.

These schools, like Stick Shift Driving Academy, offer complete curriculums, covering everything from basic clutch control to advanced maneuvers, ensuring a comprehensive learning experience.

Ultimately, they are key to keeping the art of manual driving alive.

Resources for Further Learning

Supplement your lessons with online tutorials, driving manuals, and automotive forums to deepen your understanding of manual transmission techniques and vehicle mechanics.

These resources offer valuable insights and community support for continued skill development beyond formal instruction.

Online Tutorials and Videos

Numerous online platforms offer supplementary learning materials for aspiring manual transmission drivers. YouTube channels frequently host detailed tutorials covering clutch control, gear shifting, and troubleshooting common issues.

Websites dedicated to automotive education provide step-by-step guides and visual demonstrations, enhancing understanding beyond the driving school environment. These resources are particularly helpful for reinforcing concepts and practicing techniques at your own pace.

Many tutorials focus on specific maneuvers, like hill starts or parallel parking, offering targeted practice drills. Utilizing these digital tools can significantly accelerate your learning curve and build confidence.

Driving Manuals and Guides

Comprehensive driving manuals remain valuable resources for understanding the principles of manual transmission operation. These guides detail the mechanics of gearboxes, clutch engagement, and proper shifting techniques.

Many manuals include diagrams and illustrations to visually explain complex concepts, aiding comprehension for visual learners. Supplementing driving school lessons with manual study reinforces theoretical knowledge and prepares you for practical application.

Older editions can be particularly useful for understanding the fundamentals, while newer guides may cover modern vehicle technologies and safety features.

Automotive Forums and Communities

Online automotive forums and communities provide a platform for enthusiasts to share experiences, tips, and advice regarding manual transmission driving. These spaces offer a wealth of practical knowledge from seasoned drivers, complementing formal instruction.

Discussions often cover troubleshooting common issues, refining techniques, and finding suitable practice areas. Engaging with these communities fosters a supportive learning environment and allows for peer-to-peer guidance.

Seeking advice from experienced manual drivers can accelerate skill development and build confidence.

Continue Reading

ganesha ashtottara shatanamavali in telugu pdf

Ganesha Ashtottara Shatanamavali in Telugu: A Comprehensive Plan

This plan details accessing the Ganesha Ashtottara Shatanamavali in Telugu‚ specifically focusing on PDF resources. Several websites‚ like Stotra Nidhi and ePoojaStore‚ offer downloadable Telugu PDFs for convenient chanting and study.

The Ashtottara Shatanamavali is a revered practice in Hinduism‚ consisting of 108 sacred names of a deity. Specifically‚ the Ganesha Ashtottara Shatanamavali focuses on Lord Ganesha‚ the remover of obstacles and harbinger of good fortune. These names‚ when chanted with devotion‚ are believed to invoke Ganesha’s blessings and bestow spiritual growth upon the devotee.

For Telugu-speaking devotees‚ access to the Namavali in their native language is crucial for proper pronunciation and understanding. Fortunately‚ numerous online resources provide the Ganesha Ashtottara Shatanamavali in Telugu PDF format. These PDFs often include transliteration‚ meaning‚ and sometimes even audio pronunciations‚ making the practice accessible to a wider audience. Websites like Stotra Nidhi and others dedicated to Hindu stotras are key sources for these valuable texts. The availability of these PDFs facilitates daily spiritual practice and preserves this ancient tradition.

The Significance of 108 Names

The number 108 holds profound spiritual significance in Hinduism‚ deeply interwoven with cosmology and yogic practices. It’s considered a sacred number representing wholeness and the universe. In the context of the Ashtottara Shatanamavali‚ reciting 108 names isn’t merely a numerical exercise‚ but a complete offering to the deity.

Each of the 108 names of Lord Ganesha‚ available in Ganesha Ashtottara Shatanamavali in Telugu PDF formats‚ encapsulates a specific attribute or aspect of the divine. Chanting these names is believed to activate corresponding energies within the devotee‚ fostering a deeper connection with Ganesha. The repetition amplifies the power of each name‚ creating a potent spiritual vibration. Accessing these PDFs allows Telugu speakers to engage with this powerful practice‚ understanding the nuances of each name and its associated benefits‚ preserving the tradition for future generations.

Lord Ganesha: A Brief Overview

Lord Ganesha‚ the elephant-headed deity‚ is universally revered as the remover of obstacles and the god of beginnings. He embodies wisdom‚ intellect‚ and auspiciousness‚ making him the first deity worshipped in most Hindu rituals. Ganesha’s iconography symbolizes various aspects of existence‚ with his large head representing immense wisdom and his trunk signifying adaptability.

The Ganesha Ashtottara Shatanamavali in Telugu PDF provides a pathway to connect with these divine qualities through the recitation of his 108 names. These names highlight Ganesha’s multifaceted nature‚ from his role as the protector to his embodiment of pure consciousness. Studying and chanting these names‚ readily available in Telugu PDFs‚ allows devotees to invoke his blessings for success‚ prosperity‚ and spiritual growth. This practice is deeply rooted in Hindu tradition and accessible through digital resources.

Origins and Historical Context of the Namavali

The tradition of reciting the Ashtottara Shatanamavali – 108 names – dates back centuries within Hinduism‚ evolving as a devotional practice to connect with deities. While pinpointing the exact origin is challenging‚ the practice likely emerged from the Vedic tradition of invoking divine attributes through mantras and hymns.

The Ganesha Ashtottara Shatanamavali in Telugu PDF represents a regional adaptation of this ancient practice‚ translating the Sanskrit names into Telugu for wider accessibility. The availability of these PDFs demonstrates the continued relevance of this tradition in the digital age. Historical texts suggest the compilation of such namavalis gained prominence during the Bhakti movement‚ emphasizing personal devotion. Today‚ resources like Stotra Nidhi preserve and disseminate these sacred texts‚ ensuring their continued practice and study‚ readily available as downloadable PDFs.

Understanding the Telugu Script and Pronunciation

For those unfamiliar with Telugu‚ accessing the Ganesha Ashtottara Shatanamavali in Telugu PDF requires some understanding of the script and pronunciation. Telugu is a Dravidian language with its own unique alphabet‚ distinct from the Devanagari script commonly used for Sanskrit. Key features include vowel and consonant combinations‚ and specific symbols representing sounds not found in English.

Accurate pronunciation is crucial for effective chanting. Online resources and language learning apps can aid in mastering the Telugu sounds. When using a PDF‚ pay close attention to the vowel markings and consonant groupings. Resources often provide transliterations alongside the Telugu text‚ offering a guide for non-native speakers. Familiarizing yourself with basic Telugu phonetic rules will significantly enhance your ability to recite the names correctly and experience the full benefits of the Ashtottara Shatanamavali.

Sources for Authentic Telugu Texts

Locating authentic Ganesha Ashtottara Shatanamavali in Telugu PDF versions requires careful sourcing. Stotra Nidhi emerges as a prominent online repository‚ offering downloadable PDFs alongside other stotras and religious texts. ePoojaStore also provides access to various Telugu PDFs‚ including those dedicated to Lord Ganesha. Additionally‚ blogs like Ganesha-lord.blogspot.com host textual versions‚ though verifying their accuracy is essential.

When downloading‚ prioritize websites known for their commitment to traditional practices and scriptural accuracy. Cross-referencing multiple sources is highly recommended to ensure consistency in the names and their meanings. Be cautious of unofficial websites or those with unclear origins. Look for PDFs that include clear Telugu script‚ transliterations‚ and ideally‚ explanations of the names’ significance. Prioritizing reputable sources safeguards the integrity of your practice and ensures you’re working with an authentic text.

Different Versions of the Ganesha Ashtottara Shatanamavali

While the core essence remains consistent‚ variations exist in the Ganesha Ashtottara Shatanamavali in Telugu PDF versions available. These differences often stem from regional traditions or the specific lineage followed. Notably‚ the Gakara Ashtottara Shatanamavali focuses exclusively on names beginning with the letter ‘Ga’‚ a specialized subset of the complete 108 names.

Some PDFs may include additional verses or introductory prayers‚ while others present a more concise listing of the names. The formatting and transliteration styles can also vary. It’s crucial to recognize these nuances when comparing different versions. Stotra Nidhi and ePoojaStore may offer slightly differing arrangements. When selecting a PDF‚ consider your personal preference and whether you desire a comprehensive or focused rendition of the namavali. Authenticity remains paramount‚ regardless of the specific version chosen.

The Gakara Ashtottara Shatanamavali (Names starting with ‘Ga’)

The Gakara Ashtottara Shatanamavali represents a focused subset of the complete Ganesha Ashtottara Shatanamavali in Telugu PDF‚ comprising the 108 names of Lord Ganesha that begin with the letter ‘Ga’. This specialized namavali is often chanted independently for specific purposes or as part of a larger devotional practice. Resources like Ganapathi Gakara Ashtottara Shatanamavali in Telugu provide downloadable PDFs containing these names in Telugu script.

Chanting these ‘Ga’ names is believed to invoke particular blessings related to wisdom‚ auspicious beginnings‚ and the removal of obstacles. The PDF versions typically include the names in Telugu‚ along with transliterations to aid pronunciation. While shorter than the full 108 names‚ the Gakara Ashtottara holds significant devotional value. Practitioners often find it a manageable and potent practice‚ readily accessible through online Telugu PDF resources.

Structure of the Namavali: Sections and Organization

The Ganesha Ashtottara Shatanamavali in Telugu PDF generally follows a consistent structure‚ though variations exist between different versions. Typically‚ the 108 names are presented sequentially‚ often categorized by the initial syllable. While a strict sectional division isn’t always present‚ some PDFs may group names starting with the same vowel or consonant‚ like the ‘Gakara’ section.

Most PDFs begin with an invocation or dhyana shloka‚ setting the devotional mood. The core of the document then lists the 108 names in Telugu script‚ frequently accompanied by transliterations for non-Telugu speakers. Some versions include a brief explanation of each name’s meaning. Following the names‚ you might find a concluding verse or prayer. The organization aims to facilitate easy recitation and comprehension‚ making the PDF a practical tool for devotees seeking a structured approach to chanting.

Meaning and Interpretation of Key Names (Part 1)

Exploring the Ganesha Ashtottara Shatanamavali in Telugu PDF reveals profound meanings embedded within each name. For instance‚ “Sri Vighneshwara” signifies the Lord of Obstacles‚ but not as a creator of them‚ rather as one who removes them. “Ganapati” denotes the leader of the ganas‚ divine attendants. “Vinayaka” highlights his exceptional politeness and humility.

The Telugu PDF versions often provide literal translations and deeper interpretations. “Ekadantaya” refers to his single tusk‚ symbolizing strength and the ability to discern truth. “Lambodara” describes his prominent belly‚ representing the universe. Understanding these nuances enhances the devotional experience. Chanting with awareness of the name’s meaning amplifies its spiritual impact. These interpretations‚ readily available within the PDF resources‚ offer a pathway to connect with Lord Ganesha on a more profound level.

Meaning and Interpretation of Key Names (Part 2)

Continuing the exploration of the Ganesha Ashtottara Shatanamavali in Telugu PDF‚ further names reveal intricate symbolism. “Vakratunda” describes his curved trunk‚ representing the power to overcome obstacles and the ability to adapt. “Chaturbhuja” signifies his four arms‚ embodying dharma‚ artha‚ kama‚ and moksha – the four aims of life. “Lambakarna” refers to his large ears‚ symbolizing attentiveness and wisdom.

The Telugu PDF resources often elaborate on these attributes‚ linking them to philosophical concepts. “Vikata” denotes his unique and awe-inspiring form‚ beyond conventional beauty. “Kapila” signifies his reddish-brown hue‚ representing energy and vitality. Studying these names within the PDF context deepens understanding of Ganesha’s multifaceted nature. Chanting with mindful awareness of these meanings fosters a stronger connection and unlocks the transformative potential of the Namavali.

Benefits of Chanting the Ashtottara Shatanamavali

Regular chanting of the Ganesha Ashtottara Shatanamavali‚ readily available as a Telugu PDF‚ yields profound spiritual and worldly benefits. It’s believed to remove obstacles‚ fostering success in endeavors and promoting overall well-being. The PDF facilitates consistent practice‚ allowing devotees to easily access and recite the 108 names.

Chanting enhances intellect‚ improves concentration‚ and cultivates inner peace. It’s said to mitigate the negative effects of planetary influences and protect against misfortune. Accessing the Namavali through a Telugu PDF allows for correct pronunciation and understanding of the names’ meanings‚ amplifying their potency. Devotees report increased confidence‚ improved relationships‚ and a deeper connection with the divine. Consistent recitation‚ guided by the PDF‚ unlocks Ganesha’s blessings and paves the path to spiritual growth.

Preparation for Chanting: Rituals and Guidelines

Before commencing the chanting of the Ganesha Ashtottara Shatanamavali‚ utilizing a Telugu PDF‚ proper preparation is essential. Begin with a purifying bath and wear clean‚ comfortable clothing. Find a quiet‚ serene space free from distractions. An altar adorned with a Ganesha idol or image is ideal‚ along with offerings like flowers‚ incense‚ and sweets.

Mentally prepare by focusing on Lord Ganesha and cultivating a devotional attitude. Review the Telugu PDF to familiarize yourself with the names and pronunciation. A brief meditation session can enhance concentration. Some practitioners perform a small puja before chanting‚ invoking Ganesha’s blessings. Ensure the PDF is readily accessible and well-lit. Maintaining a respectful and focused mindset throughout the chanting process is crucial for maximizing its benefits.

The Correct Method of Recitation

When reciting the Ganesha Ashtottara Shatanamavali using a Telugu PDF‚ proper pronunciation is paramount. Each name should be uttered clearly and respectfully‚ paying attention to the nuances of the Telugu script. Begin by invoking Lord Ganesha’s presence with a simple prayer. Follow the order of names as presented in the PDF‚ chanting each name 108 times for a full recitation.

Maintain a consistent rhythm and focus on the meaning of each name. Using a mala (rosary) can aid in counting repetitions. If unfamiliar with Telugu pronunciation‚ listen to audio recordings alongside the PDF to ensure accuracy. Chanting can be done silently or aloud‚ depending on personal preference. The key is sincere devotion and mindful repetition; Avoid distractions and maintain a peaceful state of mind throughout the recitation.

Frequency and Timing of Chanting

Regarding the Ganesha Ashtottara Shatanamavali in Telugu‚ the frequency of chanting is flexible‚ adapting to individual schedules and devotion. Daily recitation‚ even a portion of the 108 names from a PDF‚ is highly beneficial. Many devotees choose to chant during auspicious times‚ such as mornings before sunrise or evenings after sunset. Tuesdays‚ considered sacred to Lord Ganesha‚ are particularly favorable.

However‚ consistency is more crucial than strict adherence to specific timings. Utilizing a Telugu PDF allows for convenient chanting anytime. Some prefer reciting the entire Namavali weekly or monthly. During special occasions like Ganesh Chaturthi‚ increased frequency is common. Listen to your intuition and choose a schedule that feels comfortable and sustainable. The intention and sincerity behind the chanting are more important than the precise timing or frequency.

Combining Chanting with Puja (Worship)

Integrating the Ganesha Ashtottara Shatanamavali in Telugu with Puja enhances the devotional experience. Before commencing Puja‚ download and utilize a Telugu PDF of the Namavali for easy access to the 108 names. Begin by invoking Lord Ganesha with a traditional prayer‚ followed by chanting the Ashtottara Shatanamavali as an integral part of the worship ritual.

Offer flowers‚ incense‚ and sweets while reciting the names from the PDF. Visualize Lord Ganesha with each name‚ deepening your connection. The chanting can accompany the offering of each name as a mantra. After the Namavali‚ conclude with an Aarti and prayers for blessings. This combined practice amplifies the spiritual benefits‚ fostering devotion and seeking divine grace. The Telugu PDF ensures accurate pronunciation and understanding during the Puja.

Availability of Telugu PDF Resources Online

Numerous online platforms offer the Ganesha Ashtottara Shatanamavali in Telugu as downloadable PDF resources. Stotra Nidhi is a prominent source‚ providing a Telugu PDF alongside other stotras like the Trishati and Sahasranamavali. ePoojaStore also lists various Namavalis‚ including the Vinayaka and Vigneshwara Ashtottara Shatanamavalis‚ available in Telugu PDF format.

Websites like Ganesha-lord.blogspot.com host the text‚ though direct PDF downloads may require further searching. These resources cater to devotees seeking convenient access for chanting and study. Ensure the PDF is clearly legible and accurately transcribed in Telugu script. Regularly updated archives and digital libraries also frequently contain these sacred texts. Utilizing these online PDF resources facilitates widespread access to this powerful devotional practice‚ preserving and sharing this spiritual heritage.

Reputable Websites for Downloading the PDF

When seeking a Ganesha Ashtottara Shatanamavali Telugu PDF‚ prioritize established and trusted websites. Stotra Nidhi (stotranidhi.org) consistently ranks as a reliable source‚ offering well-formatted PDFs of various Namavalis‚ including Ganesha’s. ePoojaStore (epoojaastore.com) is another reputable option‚ providing downloadable PDFs alongside puja materials and related services.

Ganesha-lord.blogspot.com‚ while a blog‚ hosts the text and can be a starting point‚ but verify the transcription. Look for sites with clear copyright information and a history of providing accurate religious texts. Avoid unfamiliar or recently created websites. Always scan downloaded PDF files with antivirus software. These platforms generally ensure the authenticity and readability of the Telugu script‚ facilitating a meaningful devotional experience. Prioritizing these sources safeguards against inaccuracies and potential security risks.

Checking the Authenticity of PDF Texts

Verifying the authenticity of a Ganesha Ashtottara Shatanamavali Telugu PDF is crucial for accurate recitation and devotional practice. Compare the downloaded text with known‚ reliable sources like those found on Stotra Nidhi or by consulting with Telugu-speaking priests or scholars.

Pay close attention to the transliteration and the Telugu script itself. Inconsistencies in name spellings or grammatical errors are red flags. Cross-reference key names (shlokas) with established versions. Look for the publisher’s information within the PDF; reputable sources will clearly identify themselves. Be wary of PDFs lacking source attribution. If possible‚ compare multiple PDFs to identify discrepancies. A genuine text will align with traditional interpretations and maintain consistency throughout. Prioritize PDFs from established religious organizations or scholarly projects to ensure accuracy and avoid misinterpretations.

Printing and Preservation of the PDF

Once you’ve verified the authenticity of your Ganesha Ashtottara Shatanamavali Telugu PDF‚ proper printing and preservation are essential for long-term use. Opt for high-quality paper to ensure readability and durability. Consider a laser printer for sharper text and resistance to fading. When printing‚ select a font size that is comfortable for reading during chanting.

For preservation‚ store the printed copy in a clean‚ dry place‚ away from direct sunlight and humidity. Create a digital backup of the PDF on multiple devices – a computer‚ external hard drive‚ and cloud storage – to safeguard against data loss. Regularly check the digital file to ensure it remains accessible. Consider laminating a copy for increased protection against wear and tear during frequent handling. This ensures the sacred text remains available for generations of devotional practice.

Comparison with Other Ganesha Stotras

The Ganesha Ashtottara Shatanamavali‚ available in Telugu PDF format‚ differs in scope from other popular Ganesha stotras like the Trishati (300 names) and Sahasranamavali (1000 names). While the Trishati and Sahasranamavali offer more extensive lists of names‚ the Ashtottara Shatanamavali’s 108 names provide a concise yet powerful devotional practice.

Compared to shorter stotras or simple mantras‚ the Ashtottara Shatanamavali offers a richer exploration of Ganesha’s attributes. It’s a balanced option for those seeking a moderately lengthy‚ comprehensive prayer. Resources like Stotra Nidhi provide access to all three – Ashtottara‚ Trishati‚ and Sahasranamavali – in Telugu‚ allowing devotees to choose based on their time and preference. The Telugu PDF versions facilitate easy access and consistent recitation of these sacred texts‚ enhancing spiritual practice.

Ashtottara vs. Trishati vs. Sahasranamavali

When considering Ganesha stotras in Telugu PDF format‚ understanding the differences between the Ashtottara (108 names)‚ Trishati (300 names)‚ and Sahasranamavali (1000 names) is crucial. The Ashtottara Shatanamavali offers a manageable length for daily practice‚ focusing on core attributes. Websites like Stotra Nidhi provide all three versions in Telugu‚ catering to diverse devotional needs.

The Trishati expands upon the Ashtottara‚ offering a more detailed exploration of Ganesha’s qualities‚ while the Sahasranamavali represents the most comprehensive listing. Choosing depends on time commitment and desired depth of worship. Telugu PDFs of each stotra are readily available online‚ enabling consistent recitation. The Ashtottara is often preferred for its brevity and accessibility‚ making it ideal for beginners or those with limited time‚ while the others offer a more immersive experience.

The Role of the Namavali in Daily Spiritual Practice

Integrating the Ganesha Ashtottara Shatanamavali‚ readily available as a Telugu PDF‚ into daily spiritual practice fosters a deeper connection with the deity. Chanting these 108 names cultivates positive energy‚ removes obstacles‚ and promotes wisdom. Many devotees incorporate it into their morning rituals or before undertaking important tasks.

The Telugu PDF format allows for convenient access and recitation‚ even for those unfamiliar with traditional Sanskrit pronunciation. Regular chanting‚ alongside Puja (worship)‚ amplifies its benefits. Resources like Stotra Nidhi and ePoojaStore provide easily downloadable PDFs. The Namavali isn’t merely a recitation; it’s a meditative practice‚ a form of japa‚ that stills the mind and opens the heart. Consistent practice‚ guided by authentic Telugu texts‚ strengthens faith and invites divine grace into daily life.

Addressing Common Questions and Misconceptions

A frequent question concerns the authenticity of Telugu PDFs for the Ganesha Ashtottara Shatanamavali. It’s crucial to source from reputable websites like Stotra Nidhi and verify the text against known translations. Some worry about pronunciation; utilizing a PDF with transliteration can assist.

A misconception is that chanting requires perfect Sanskrit – the devotional intent is paramount. Another concern is the time commitment; even reciting a few names daily yields benefits. Downloading a Telugu PDF doesn’t replace understanding the names’ meanings. It’s a tool to facilitate practice. Beware of PDFs with inconsistent formatting or errors. Authentic texts‚ often found on dedicated stotra websites‚ ensure accurate recitation and a meaningful spiritual experience. Prioritize quality over convenience when selecting a PDF resource;

Future Trends in Digital Preservation of Stotras

The digital preservation of the Ganesha Ashtottara Shatanamavali in Telugu‚ and stotras generally‚ is evolving. We anticipate increased use of Optical Character Recognition (OCR) to convert scanned‚ older Telugu texts into searchable PDFs‚ improving accessibility. Blockchain technology could verify the authenticity of digital stotra texts‚ combating inaccuracies.

Interactive PDFs‚ incorporating audio pronunciations in Telugu‚ are likely to become more common. Machine translation advancements may offer more accurate English interpretations alongside the Telugu text. Cloud-based storage will ensure long-term preservation‚ mitigating data loss. Community-driven projects‚ crowdsourcing corrections and translations‚ will enhance quality. Expect more mobile applications dedicated to stotra recitation‚ featuring downloadable Telugu PDFs and personalized chanting schedules. These trends aim to make ancient wisdom readily available and safeguard it for future generations.

Community Resources and Online Forums

Several online platforms foster a community around the Ganesha Ashtottara Shatanamavali in Telugu and related spiritual practices. Dedicated Facebook groups and WhatsApp communities allow devotees to share PDFs‚ discuss interpretations‚ and seek clarification on pronunciation. Online forums‚ though less specific to this particular stotra‚ often host threads on Hindu scriptures and Telugu devotional texts.

Websites like Stotra Nidhi‚ while primarily repositories‚ often have comment sections where users exchange information. ePoojaStore may also feature user reviews or forums. Look for Telugu language blogs and websites dedicated to Hindu rituals‚ as they frequently link to downloadable PDFs and offer guidance. These communities are invaluable for verifying PDF authenticity‚ discovering rare versions‚ and connecting with fellow practitioners. Active participation can significantly enrich your understanding and practice.

The Ganesha Ashtottara Shatanamavali in Telugu‚ readily accessible through numerous PDF resources online‚ continues to be a potent spiritual tool for devotees. Its enduring power lies in the devotional resonance of each name‚ offering a pathway to connect with Lord Ganesha’s blessings. The availability of Telugu PDFs ensures wider accessibility‚ preserving this ancient tradition for future generations.

Whether chanted daily‚ incorporated into puja rituals‚ or studied for its profound meanings‚ the Namavali’s impact is deeply personal and transformative. Platforms like Stotra Nidhi and ePoojaStore facilitate this connection‚ providing convenient access to authentic texts. The digital preservation of these stotras is crucial‚ ensuring their continued relevance in a rapidly evolving world. Embracing this practice fosters spiritual growth and strengthens the devotee’s bond with the benevolent Ganesha.

Appendix: List of Websites with Telugu PDFs

Below is a curated list of websites offering the Ganesha Ashtottara Shatanamavali in Telugu PDF format. These resources provide convenient access for devotees seeking to engage with this sacred text.

  • Stotra Nidhi: http://stotranidhi.com/ – Offers both Sri Vinayaka and Sri Ganesha Ashtottara Shatanamavali in Telugu‚ alongside other stotras and religious texts.
  • ePoojaStore: https://epoojaastore.com/ – Provides access to various Ashtottara Shatanamavalis‚ including options for Ganesha‚ in Telugu.
  • Ganesha-lord.blogspot.com: http://ganesha-lord.blogspot.com/ – Features Ganesha Ashtottara Sata Namavali Telugu Lyrics (Text) and script.

Please exercise caution and verify the authenticity of any downloaded PDF before use. These links were current as of today’s date‚ but website availability may change.

Continue Reading

manual vending machine

Manual Vending Machine: A Comprehensive Guide

Dive into the world of self-made automated retail! This guide explores building vending machines using readily available materials‚
perfect for makers‚ hobbyists‚ and anyone desiring a unique‚ hands-on project․ Discover innovative designs and construction techniques․

Manual vending machines represent a fascinating intersection of ingenuity‚ resourcefulness‚ and the desire for convenient access to treats and small items․ Unlike their electrically powered counterparts‚ these machines rely on human interaction and simple mechanical principles for operation․ This approach opens doors to exciting DIY projects‚ allowing individuals to construct personalized vending solutions tailored to their specific needs and preferences․

The appeal lies in their accessibility; building a manual vending machine doesn’t require extensive technical expertise or expensive components․ Projects like those pioneered by makers such as Ryan Bates and Dejan Nedelkovski demonstrate the feasibility of creating functional vending systems using cardboard‚ wood‚ and basic mechanical parts․ These creations often blend functionality with playful designs‚ exemplified by gumball and pinball combinations‚ or even Oreo and milk dispensers․

This guide will delve into the core concepts‚ construction techniques‚ and potential customizations involved in building your own manual vending machine‚ offering a pathway to a rewarding and surprisingly practical DIY experience․

Historical Context of Vending Machines

The roots of vending machines stretch back to ancient Egypt‚ with automated holy water dispensers appearing as early as the 1st century AD․ However‚ the precursors to modern vending machines emerged in 17th-century England‚ featuring tobacco boxes with coin mechanisms․ These early devices‚ while rudimentary‚ established the core principle of automated dispensing․

The 19th century witnessed significant advancements‚ particularly with the invention of the first postcard vending machine in the 1880s․ This period saw a surge in vending machine innovation‚ driven by industrialization and a growing demand for convenient access to goods․ Early machines were entirely mechanical‚ relying on intricate clockwork mechanisms and levers – essentially‚ manual vending in its purest form․

The transition to electric vending machines began in the late 19th and early 20th centuries‚ but the fundamental principles of mechanical dispensing remained crucial․ Today’s DIY manual vending machine projects represent a return to these origins‚ celebrating the elegance and simplicity of purely mechanical automation․

The Appeal of DIY Manual Vending Machines

The resurgence of interest in DIY manual vending machines stems from a desire for tangible‚ hands-on projects in an increasingly digital world․ Building one offers a unique blend of engineering‚ creativity‚ and problem-solving‚ appealing to makers‚ Arduino enthusiasts‚ and hobbyists alike․ It’s a rewarding experience to construct a functional machine from basic materials․

Beyond the satisfaction of creation‚ these projects offer a cost-effective alternative to commercially available vending machines․ Utilizing readily available materials like cardboard and wood keeps expenses low‚ making it accessible to a wider audience․ The customization potential is also a major draw – builders can tailor the machine’s design and functionality to their specific needs and preferences․

Furthermore‚ manual vending machines provide an educational opportunity‚ demonstrating fundamental mechanical principles in a practical way․ They represent a playful intersection of nostalgia and innovation‚ offering a unique and engaging project for all ages․

Core Components & Materials

Essential building blocks include cardboard‚ wood‚ DC motors‚ nine-volt batteries‚ and hot glue․ Mechanical parts are crucial for dispensing‚ creating a functional system․

Essential Mechanical Parts

Constructing a manual vending machine hinges on carefully selected mechanical components․ Levers are fundamental‚ forming the core of dispensing mechanisms‚ allowing for controlled release of products․ Consider robust lever arms and precise pivot points for smooth operation․

Furthermore‚ rollers or rotating drums can facilitate product movement‚ especially in gravity-fed systems․ These need to be smoothly rotating and durable enough to withstand repeated use․

Chutes are vital for directing dispensed items to the collection area; their angle and smoothness are key to preventing jams․ Springs can provide assistance in returning levers to their starting positions or in gently nudging products forward․

Finally‚ consider using stoppers or barriers to regulate the flow of products and prevent multiple items from dispensing simultaneously․ Precise alignment and secure fastening of these parts are paramount for a reliable vending experience․

Sourcing Affordable Materials (Cardboard‚ Wood‚ etc․)

Building a manual vending machine doesn’t require expensive resources! Cardboard is an excellent starting point – readily available‚ free‚ and easily cut and shaped․ Repurposed boxes offer a sustainable and cost-effective base for your project․

For increased durability‚ consider incorporating wood – plywood scraps or reclaimed lumber are ideal․ These provide structural support for levers‚ chutes‚ and the overall frame․ Local hardware stores often sell offcuts at discounted prices․

Plastic containers‚ like bottles or tubs‚ can serve as product holders or dispensing channels․ Hot glue and tape are essential for assembly‚ keeping costs minimal․

Don’t overlook household items! Coat hangers can be bent into levers‚ and bottle caps can act as stoppers․ Resourcefulness is key to building a functional and affordable vending machine․

Tools Required for Construction

Constructing a manual vending machine demands a basic toolkit‚ but nothing overly specialized․ A sharp utility knife or box cutter is crucial for precisely cutting cardboard and other materials․ A sturdy pair of scissors will also prove invaluable for smaller adjustments and detail work․

A hot glue gun is essential for quick and secure bonding of components․ Ensure you have plenty of glue sticks! A ruler or measuring tape guarantees accurate dimensions and alignment․ A pencil is needed for marking cut lines and design elements․

Depending on the materials used‚ a handsaw or jigsaw might be necessary for cutting wood․ Safety glasses are paramount to protect your eyes from debris․ Consider a drill for creating holes for levers or dispensing mechanisms․

Basic pliers can assist with bending wire or manipulating small parts․ These tools will empower you to bring your vending machine vision to life!

Construction Techniques & Designs

Explore diverse building methods! From simple cardboard structures to more robust wooden frames‚ learn to craft functional vending machines with innovative dispensing systems․

Basic Cardboard Vending Machine Design

Embark on a beginner-friendly project! Utilizing cardboard as the primary material offers an accessible and cost-effective entry point into vending machine construction․ Begin by designing a box-like structure with a dispensing slot and a product loading area․ Reinforce corners and seams with ample tape to ensure structural integrity․

Consider a modular design‚ creating separate compartments for different products․ This simplifies restocking and prevents jamming․ The front panel should feature a clear window to showcase the available items․ Precision cutting is crucial for smooth operation; utilize a sharp utility knife and a ruler for accurate measurements․

Focus on creating a reliable dispensing mechanism – a simple push or lever system works well with cardboard․ Remember to test the design thoroughly at each stage‚ making adjustments as needed to optimize performance․ Cardboard’s lightweight nature makes it easy to modify and refine your creation․

Lever-Based Dispensing Mechanisms

Implement a classic‚ reliable dispensing method! A lever system translates manual force into product release‚ ideal for manual vending machines․ Construct a lever arm connected to a pusher or gate that blocks product access․ When the lever is depressed‚ it retracts the barrier‚ allowing an item to fall into the dispensing slot․

Precise pivot points are essential for smooth operation; use sturdy cardboard or wooden dowels for the fulcrum․ Experiment with lever length to optimize force required for dispensing․ Consider adding a return spring (rubber band) to restore the lever to its original position after each use․

Calibration is key – adjust the lever’s travel distance to dispense only one item at a time․ Reinforce the lever arm to prevent bending or breakage under repeated use․ This mechanism provides tactile feedback‚ confirming successful product delivery‚ enhancing the user experience․

Gravity-Fed Dispensing Systems

Harness the power of gravity for simple‚ effective dispensing! Gravity-fed systems are among the easiest to implement in manual vending machines․ Design a sloped channel or tube where products rest‚ relying on gravity to move them towards an opening when a barrier is removed․

The angle of the slope dictates dispensing speed; steeper angles mean faster release‚ but require precise control․ A rotating drum with strategically placed holes can also function as a gravity-fed dispenser․ Ensure the product’s shape and size are compatible with the channel to prevent jams․

A simple flap or sliding door‚ controlled by a lever or button‚ acts as the release mechanism․ Careful consideration of friction is crucial for consistent dispensing․ Smooth surfaces minimize resistance‚ while textured surfaces can provide grip․ This method is exceptionally well-suited for smaller‚ uniformly shaped items․

Powering & Automation (Minimalist Approach)

Embrace simplicity! Manual vending prioritizes human operation‚ but minimal automation—like DC motors—can assist dispensing‚ powered by readily available battery sources․

Manual Operation vs․ Simple Automation

The core appeal of a manual vending machine lies in its direct‚ human-powered functionality․ This approach eliminates the complexities of microcontrollers‚ sensors‚ and extensive wiring‚ offering a satisfyingly tactile experience․ Users directly interact with the machine‚ utilizing levers‚ cranks‚ or push mechanisms to retrieve their desired item․ This simplicity translates to lower construction costs and easier maintenance․

However‚ incorporating simple automation can enhance usability without sacrificing the DIY spirit․ A small DC motor‚ for instance‚ can assist with dispensing‚ particularly for heavier items or more complex mechanisms․ This reduces the physical effort required by the user‚ making the machine more accessible․ The key is to maintain a minimalist approach – automation should assist‚ not replace‚ the manual element․ It’s about finding a balance between the charm of a fully mechanical system and the convenience of a little powered help․

Using DC Motors for Assisted Dispensing

Integrating a DC motor into your manual vending machine offers a practical boost to dispensing heavier or awkwardly shaped items․ Rather than relying solely on manual force‚ a motor can provide the necessary torque to reliably release products․ Consider a setup where a hand crank activates the motor‚ creating a powered-assist system – maintaining the manual interaction while reducing user effort․

When selecting a motor‚ prioritize low voltage options (like 9V or 12V) for safety and ease of power supply․ Gear reduction is crucial; it trades speed for increased torque‚ essential for overcoming resistance․ The motor’s shaft can be coupled to the dispensing mechanism via a simple pulley system or a direct drive connection․ Remember to include a switch to control the motor’s operation and prevent continuous running․ Careful wiring and secure mounting are vital for a functional and safe automated assist․

Battery Power Considerations

For manual vending machines incorporating DC motors or simple automation‚ battery power offers portability and independence from mains electricity․ However‚ careful consideration must be given to battery type‚ voltage‚ and capacity to ensure reliable operation․ Alkaline batteries are a convenient starting point‚ but rechargeable options like NiMH or Li-ion provide long-term cost savings and reduced environmental impact․

Voltage must match the motor’s requirements – typically 9V or 12V․ Capacity‚ measured in mAh (milliampere-hours)‚ dictates runtime․ Higher mAh equates to longer operation between charges․ Consider the motor’s current draw and estimate usage frequency to determine appropriate capacity․ A battery holder or connector simplifies replacement and maintenance․ Always prioritize safety; use appropriate fuses and avoid short circuits․ Proper battery management extends lifespan and prevents potential hazards․

Specific Project Examples

Explore exciting builds! From gumball and pinball marvels to Oreo and milk dispensers‚ these projects demonstrate the versatility and fun of DIY vending machines․

DIY Gumball & Pinball Vending Machine

Combining classic fun with DIY ingenuity‚ this project creates a unique vending experience․ Imagine a machine that dispenses both gumballs and pinballs – a delightful fusion for any game room or hobby space! The core concept revolves around a manually operated system‚ often utilizing a rotating drum or a series of cleverly positioned levers․

Construction typically involves a cardboard or wooden frame‚ carefully designed to hold the gumballs and pinballs separately․ A coin mechanism‚ even a simplified manual one‚ can be incorporated for a more authentic vending feel․ The dispensing action is often achieved by rotating a wheel with appropriately sized holes‚ allowing one item to drop at a time․ This isn’t just a vending machine; it’s a captivating‚ interactive game!

Dejan Nedelkovski’s tutorial provides a fantastic starting point‚ showcasing how to bring this vision to life with readily available materials and a bit of maker spirit․ It’s a rewarding project that blends functionality with playful creativity․

Oreo & Milk Vending Machine Construction

Believe it or not‚ a fully functional Oreo and milk vending machine is achievable with minimal resources! This project demonstrates the power of ingenuity‚ utilizing primarily cardboard‚ a small DC motor‚ a nine-volt battery‚ and‚ of course‚ plenty of hot glue․ The construction focuses on creating separate compartments for the Oreos and a carton of milk․

The DC motor plays a crucial role in assisting the dispensing process‚ gently nudging the Oreos towards a delivery chute․ A simple lever system‚ activated manually‚ can trigger the motor and release a single cookie․ The milk dispensing requires a bit more finesse‚ potentially involving a tilting mechanism or a carefully positioned spout․

Ryan Bates’ creation exemplifies how accessible vending machine construction can be․ It’s a fantastic project for demonstrating basic mechanical principles and satisfying that sweet tooth with a custom-built marvel!

Customizable Snack Dispensing Machines

The beauty of DIY manual vending machines lies in their adaptability! Beyond Oreos and gumballs‚ these creations can be tailored to dispense a wide variety of snacks – from small candies and nuts to miniature toys and even homemade treats․ The core principles of lever-based or gravity-fed systems remain consistent‚ but the specific design will vary based on the snack’s size‚ shape‚ and fragility․

Consider building modular compartments within the machine to accommodate different snack types․ Adjustable chutes and dispensing mechanisms allow for precise control‚ preventing jams and ensuring a smooth delivery․ Experiment with different materials – wood offers durability‚ while cardboard provides affordability and ease of modification․

Dejan Nedelkovski’s work inspires makers to push boundaries‚ creating truly personalized vending experiences․ Let your imagination run wild and build a snack machine perfectly suited to your preferences!

Advanced Features & Modifications

Elevate your creation! Explore manual coin mechanisms‚ expanded product capacity‚ and aesthetic customizations to build a truly unique and functional vending machine․

Coin Mechanisms & Payment Systems (Manual)

Implementing a manual payment system adds a layer of realism to your DIY vending machine․ While fully automated solutions require electronics‚ a simple‚ mechanical approach is achievable and aligns with the “manual” ethos․ Consider utilizing a basic lever and gate system where inserting a coin of the correct size and weight triggers the dispensing mechanism․

This can be constructed from cardboard‚ wood‚ or even repurposed materials like plastic containers․ The key is precise calibration to accept only the intended denomination․ A tilting platform activated by the coin’s weight is another viable option․ More complex systems might involve a rotating drum with coin-sized slots‚ requiring the correct coin to align and release a lever․

Remember‚ the goal isn’t foolproof security‚ but a fun and engaging interaction․ Focus on creating a reliable system that consistently releases a product upon valid “payment‚” enhancing the overall vending experience․ Thorough testing is crucial for smooth operation․

Adding Product Variety & Capacity

Expanding your manual vending machine’s offerings requires thoughtful design adjustments․ To accommodate diverse products – from gumballs to cookies – modular dispensing units are ideal․ Each unit can be tailored to the specific size and shape of the item‚ ensuring reliable release․ Consider using adjustable dividers within the product columns to prevent jamming and maintain organization․

Increasing capacity often means scaling up the machine’s overall dimensions or cleverly utilizing vertical space․ Stackable dispensing trays‚ similar to those found in commercial machines‚ can significantly boost storage․ However‚ remember that a larger machine demands a more robust frame and dispensing mechanism to handle the increased weight and complexity․

Prioritize accessibility for refilling․ Removable panels or doors simplify restocking‚ making the machine more user-friendly․ Careful planning ensures both variety and ample supply are readily available․

Aesthetic Enhancements & Customization

Transform your functional creation into a visual centerpiece! Aesthetic enhancements breathe life into your manual vending machine․ Consider vibrant paint schemes‚ themed decals‚ or even incorporating reclaimed materials for a rustic look․ Clear acrylic panels allow a tempting view of the available products‚ boosting appeal․

Customization extends beyond visuals; Add personalized signage‚ branding elements‚ or interactive features like a hand-painted product menu․ Lighting‚ even simple LED strips‚ dramatically improves visibility and creates an inviting atmosphere․ Think about the overall style – retro‚ modern‚ whimsical – and tailor the design accordingly․

Don’t underestimate the power of detail․ Decorative trim‚ unique coin slots‚ or a custom-built dispensing lever can elevate the machine’s aesthetic․ Let your creativity flow and build a vending machine that reflects your personality!

Continue Reading

14 stations of the cross pictures pdf

The Stations of the Cross, a devotional practice, vividly recounts Jesus Christ’s final journey. Numerous resources offer 14 stations of the cross pictures in PDF format, aiding prayerful reflection and understanding of this sacred tradition, often found in churches and school grounds.

Historical Background of the Stations

The origins of the Stations of the Cross trace back to the early Christians in Jerusalem, who frequently visited the sites associated with Jesus’ Passion. Pilgrimages to the Holy Land allowed faithful to retrace Christ’s steps along the Via Dolorosa – the “Sorrowful Way.”

Initially, this devotion involved visiting actual locations. As travel became difficult, especially during times of political unrest or for those unable to journey to Jerusalem, the practice evolved. Around the 14th century, the concept of establishing stations within churches emerged, allowing believers to make a pilgrimage in spirit.

Early representations often involved simple crosses or images. The standardization of 14 stations, with accompanying prayers, developed over time, becoming firmly established in the 17th century. Today, readily available 14 stations of the cross pictures in PDF format facilitate this devotion globally, mirroring the historical pilgrimage experience.

Significance in Catholic Tradition

The Stations of the Cross hold profound significance within the Catholic tradition, serving as a powerful reminder of Christ’s suffering and sacrifice. It’s a deeply personal yet communal practice, encouraging empathy and contemplation of His Passion. This devotion isn’t merely a historical recollection; it’s an invitation to participate, in spirit, in Christ’s redemptive journey.

The Stations are often observed during Lent, a season of penance and preparation for Easter, but can be practiced year-round. They offer a structured form of prayer and meditation, guiding the faithful through key moments of Jesus’ final hours.

The accessibility of 14 stations of the cross pictures in PDF format has broadened participation, allowing individuals and families to engage with this tradition at their convenience. These visual aids enhance the devotional experience, fostering a deeper connection with the narrative and its spiritual meaning within the Catholic faith.

Purpose of Visual Representations (Pictures)

Visual representations, like the 14 stations of the cross pictures readily available in PDF format, serve a crucial purpose in devotional practice. For centuries, images have aided understanding and emotional connection to religious narratives, particularly for those who were illiterate. They transcend language barriers, communicating the story of Christ’s Passion universally.

These images aren’t simply decorative; they act as focal points for prayer and meditation, inviting contemplation of each station’s significance. They help the faithful to visualize the events, fostering a more immersive and empathetic experience.

The widespread availability of these images, often as downloadable PDFs, makes this powerful devotion accessible to a wider audience. High-quality images, like those by Leonard Porter, enhance the artistic and spiritual impact, deepening the connection to the sacred story.

Understanding the Stations as a Devotional Practice

Stations of the Cross, often aided by 14 stations of the cross pictures in PDF form, offer a powerful journey of prayer, reflection, and spiritual growth.

The Journey of Christ to Calvary

The Stations of the Cross meticulously detail Jesus’s agonizing path to Calvary, beginning with His condemnation and culminating in His entombment. Visual aids, such as 14 stations of the cross pictures readily available as a PDF download, profoundly enhance this devotional experience.

These images serve as focal points for meditation, allowing individuals to intimately connect with Christ’s suffering. The journey isn’t merely a historical recounting; it’s an invitation to participate in His pain and sacrifice.

Utilizing a PDF containing these images facilitates personal or communal prayer, guiding reflection through each station. The visual representations, often found in churches or as downloadable resources, help to vividly portray the events, fostering a deeper understanding of the Passion. They transform the narrative into a tangible, emotionally resonant experience, encouraging empathy and spiritual growth.

Prayer and Meditation During the Stations

Engaging with the 14 Stations of the Cross through prayer and meditation is deeply personal. Utilizing 14 stations of the cross pictures, often conveniently accessed as a PDF, significantly enriches this practice. Each station invites contemplation of a specific moment in Christ’s Passion, prompting reflection on His suffering and sacrifice.

The images act as visual anchors, aiding concentration and emotional connection. Prayers traditionally accompany each station, but personal reflections are equally valuable. A downloadable PDF allows for convenient, focused devotion, whether practiced individually or within a group.

These visual aids aren’t merely decorative; they’re tools for spiritual growth, fostering empathy and a deeper understanding of faith. The accessibility of PDF versions ensures this powerful devotional practice is readily available to all, promoting a more intimate relationship with Christ’s Passion.

Individual vs. Communal Observance

The 14 Stations of the Cross can be experienced profoundly both individually and as a community. For personal devotion, a 14 stations of the cross pictures PDF provides a portable and accessible resource for private prayer and meditation, allowing focused reflection on each station at one’s own pace.

Communal observance, often during Lent, involves a congregation moving between stations, reciting prayers and hymns together. Even in a group setting, individuals can utilize personal copies of the PDF with images to enhance their experience.

The PDF format facilitates wider participation, enabling those unable to attend in person to follow along remotely. Whether solitary or shared, the core purpose remains the same: to contemplate Christ’s Passion and deepen one’s faith through visual and spiritual engagement with these powerful stations.

The 14 Stations: A Detailed Overview

14 Stations of the Cross pictures, often available as a PDF, depict Jesus’s path—condemnation to tomb—guiding reflection and prayerful consideration of each event.

Station 1: Jesus is Condemned to Death

Station 1 portrays Pontius Pilate’s unjust sentencing of Jesus to crucifixion, a pivotal moment initiating the Passion. Visual representations, frequently found within 14 Stations of the Cross pictures available as a downloadable PDF, powerfully illustrate this scene. These images often depict Pilate washing his hands, symbolizing his attempt to distance himself from the responsibility of Jesus’s fate.

The PDF resources commonly include accompanying prayers and meditations focused on themes of injustice, false accusation, and the weight of sin. Contemplating images of this station encourages reflection on personal judgment and the courage to stand for truth, even in the face of opposition. The visual aid enhances understanding of the historical and spiritual significance of this initial step in Christ’s suffering, making it accessible for individual or communal devotion. High-resolution images within the PDF allow for detailed examination of artistic interpretations.

Station 2: Jesus Carries His Cross

Station 2 depicts the immense physical and spiritual burden Jesus endured as He carried the cross to Calvary. Many 14 Stations of the Cross pictures, conveniently compiled in PDF format, showcase this agonizing journey. These images often emphasize Jesus’s weakened state and the weight of the cross, symbolizing the sins of humanity He bore.

PDF resources dedicated to the Stations frequently include prayers focusing on strength in suffering, acceptance of one’s burdens, and empathy for those who carry heavy crosses in their own lives. The visual impact of these images, especially in high-resolution JPEG format within the PDF, fosters a deeper connection to Christ’s sacrifice. Meditating on this station encourages reflection on personal struggles and the importance of perseverance. The downloadable PDF provides a readily accessible tool for personal or group devotional practice, enhancing spiritual understanding.

Station 3: Jesus Falls the First Time

Station 3 portrays the first of Jesus’s falls during His arduous trek to Calvary, highlighting His human frailty and the brutal reality of His Passion. Numerous 14 Stations of the Cross pictures, readily available as a PDF download, capture this moment of vulnerability and exhaustion. These images often depict Jesus collapsing under the weight of the cross, emphasizing His suffering and the injustice of His condemnation.

Within PDF guides dedicated to the Stations, prayers at this station often center on seeking forgiveness for personal failings and recognizing the times we “fall” in our own spiritual journeys. High-resolution JPEG images within the PDF powerfully convey the physical and emotional toll. Reflecting on this station encourages humility and a renewed commitment to following Christ, even amidst difficulties. The accessible PDF format facilitates personal devotion or communal prayer, deepening the experience of empathy and faith.

Accessing 14 Stations of the Cross Pictures in PDF Format

Numerous online sources provide 14 Stations of the Cross pictures as free PDF downloads, offering convenient access to visual aids for prayer and meditation.

Sources for Free PDF Downloads

Locating free PDF downloads of the 14 Stations of the Cross pictures is readily achievable through various online platforms. Several Catholic websites and parish resources offer downloadable sets, often including accompanying prayers and reflections. A search utilizing keywords like “Stations of the Cross PDF,” “Way of the Cross images,” or “14 Stations downloadable” will yield numerous results.

Specifically, resources like those associated with Saint Theresas Primary School offer downloadable materials. Additionally, websites dedicated to Catholic art and devotion frequently host these images in PDF format. Some sites provide complete sets, while others offer individual station images for customized use. It’s important to verify the source’s credibility and ensure the files are free from malware before downloading. These resources aim to facilitate personal or communal prayer experiences centered around Christ’s Passion.

High-Resolution Image Quality (HD JPEG)

Seeking high-resolution (HD) JPEG images of the 14 Stations of the Cross is crucial for optimal printing and visual clarity. Many online sources now provide these images, ensuring detail and vibrancy when reproduced. The availability of HD JPEGs allows for larger-format prints suitable for church displays or personal devotional use.

When downloading, prioritize files explicitly labeled as “HD” or with a high pixel count. This guarantees sharper images, especially when enlarged. Several websites specializing in religious art offer downloadable sets in HD JPEG format. These high-quality images faithfully represent the artistic details of each station, enhancing the meditative experience. Consider the intended use – larger prints necessitate higher resolutions to avoid pixelation and maintain visual impact. Ensuring quality enhances the devotional aspect.

Considerations for Printing and Use

When utilizing 14 Stations of the Cross pictures downloaded in PDF format, several printing considerations are vital. Paper quality significantly impacts the final appearance; heavier, matte paper generally yields richer colors and reduces glare. Ensure your printer settings are configured for high-quality printing to maximize detail from the HD JPEG images.

For communal use, consider laminating the printed stations for durability and protection against wear and tear. Think about the size – larger prints are more visible but require more space. Respectful use is paramount; these images are sacred representations. Proper mounting and placement within a church or home enhance the devotional atmosphere. Always verify copyright permissions before reproducing images for distribution beyond personal use, ensuring ethical and legal compliance.

Artistic Representations and Styles

Leonard Porter’s paintings at Christ the King Church exemplify diverse artistic interpretations of the 14 Stations, often found as images within PDF resources.

Leonard Porter’s Paintings at Christ the King Church

Leonard Porter’s remarkable series of fourteen paintings, originally created for Christ the King Church, stands as a significant example of artistic devotion to the Stations of the Cross. These works aren’t merely depictions; they are powerful visual narratives of Christ’s Passion, offering a deeply moving experience for those who contemplate them.

The church’s collection provides a tangible connection to the spiritual journey, and increasingly, high-quality images of these paintings are being made available in PDF format. This allows wider access for personal devotion, educational purposes, and for those unable to visit the church in person. These 14 stations of the cross pictures, often available for free download, preserve Porter’s artistry and facilitate prayerful reflection.

The availability of these images in PDF form ensures the preservation and dissemination of this important artistic and religious heritage, allowing individuals and communities to engage with the Stations in a meaningful way, regardless of location.

Common Iconography and Symbolism

Across various artistic representations of the 14 Stations of the Cross, recurring iconography and symbolism deepen the devotional experience. Common elements include the cross itself – representing sacrifice – and depictions of suffering, such as Christ falling or being scourged. Images frequently feature figures like Simon of Cyrene, Veronica, and Roman soldiers, each playing a role in the Passion narrative.

When exploring 14 stations of the cross pictures in PDF format, observe the consistent use of these symbols. The crown of thorns signifies Christ’s royalty and humiliation, while the ladder represents the instrument of crucifixion. These visual cues, readily available in downloadable resources, enhance understanding and facilitate meditative prayer.

The widespread availability of these images in PDF allows for detailed study of the symbolism, fostering a richer appreciation for the depth of this traditional Catholic practice and the artistry involved in its depiction.

Variations in Artistic Interpretation

While the core narrative of the 14 Stations of the Cross remains constant, artistic interpretations exhibit significant variations. Leonard Porter’s paintings at Christ the King Church exemplify a specific style, but countless other artists have offered unique perspectives. These differences span mediums – from traditional oil paintings to modern sculptures – and stylistic approaches, ranging from realism to abstract expressionism.

Exploring 14 stations of the cross pictures in PDF format reveals this diversity. Some depictions emphasize Christ’s physical suffering, while others focus on the emotional toll on Mary and other witnesses. The availability of numerous PDF resources allows for comparative analysis of these artistic choices.

These variations aren’t deviations, but rather enrichments, offering diverse entry points for personal reflection and deepening one’s understanding of the Passion story through different artistic lenses.

Continue Reading